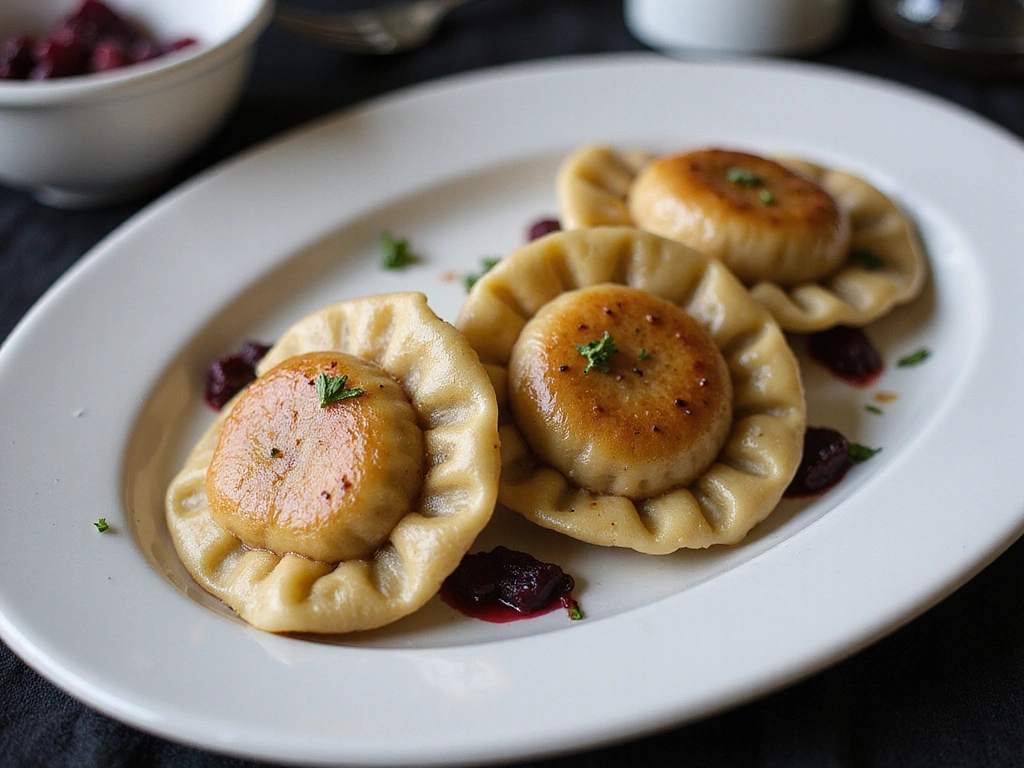
Beet & Goat Cheese Pierogi
Jump to RecipeBeet & Goat Cheese Pierogi bring together the earthy sweetness of beets with the tangy creaminess of goat cheese, all tucked inside tender pierogi dough. This vegetarian take on classic Polish dumplings is as comforting as it is visually striking, perfect for a cozy weeknight dinner or a festive gathering. The filling comes together quickly: mashed beets blended with creamy goat cheese and sautéed onions, seasoned with salt and pepper for balance. Roll the dough on a floured surface, cut into circles, place a spoonful of filling on each circle, fold over, and seal the edges tightly. Boil the pierogi in salted water until they float to the surface, then finish with a quick butter-sautéed onion and a dollop of sour cream for serving.
Ingredients
pierogi dough
Tip: If making from scratch, rest the dough 15–30 minutes, roll it very thin (about 1/16 inch), and cut circles with a sturdy cutter to prevent tearing. Keep dough covered to prevent drying. For substitutions, use store-bought dumpling or wonton wrappers (gluten-free wrappers are available if needed). To freeze, assemble pierogi on a baking sheet, freeze solid, then transfer to a bag or container.
beet, cooked and diced
Tip: Roasting beets intensifies color and sweetness—wrap in foil and roast until tender, then dice. Wear gloves to avoid staining. If using canned beets, pat dry to prevent soggy filling. For extra depth, toss diced beets with a splash of balsamic or orange juice before mixing with cheese.
goat cheese
Tip: Soften to room temperature to mix smoothly into the filling. For a creamier texture, blend with a small amount of cream cheese or a splash of cream. If you prefer a milder flavor, substitute with feta or ricotta. A touch of lemon zest or fresh herbs (like chives or dill) can brighten the filling.
onion, finely chopped
Tip: Sauté in butter until translucent to mellow the sharpness; for deeper sweetness, cook a bit longer to lightly caramelize. You can substitute shallots or finely minced leeks for a different profile. If you want to reduce moisture, pat the onions dry after chopping.
butter
Tip: Use unsalted butter so you control the salt level; melt gently to avoid browning. For a dairy-free option, substitute with olive oil or a neutral oil. Browned butter adds a nutty, rich note but watch the color to avoid bitterness.
salt
Tip: Taste before sealing the dough; 1 teaspoon for 2 cups of dough is a starting point, but adjust for cheese’s saltiness. If using salted goat cheese, reduce added salt. Consider finishing with a light pinch of flaky salt just before serving.
pepper
Tip: Use freshly ground black pepper for the best aroma; white pepper is a milder alternative if you want a lighter filling. Start with a small amount and adjust to taste to balance the beet sweetness.
sour cream (for serving)
Tip: Serve a dollop of sour cream on top or on the side to balance the filling’s sweetness. For dairy-free versions, try a thick almond or coconut yogurt, or a lemony yogurt sauce. You can also mix sour cream with chopped chives or dill for extra freshness.
Cooking Steps
Step 1: Melt butter and sauté onion
In a skillet, melt the butter over medium heat and add the finely chopped onion. Cook until translucent, about 4–6 minutes, stirring occasionally. Do not let the butter burn or the onion brown.Tips:Chop onion evenly for consistent cooking; if you want quicker, you can use pre-chopped onions. Use a little extra butter or oil if the pan is dry.Notes:If you prefer sweeter onions, cook a little longer; if the butter starts to brown, turn the heat down.Step 2: Make beet and goat cheese filling
In a bowl, combine the cooked beets (1 cup), goat cheese (1 cup), and the sautéed onions from Step 1. Season with salt and pepper and mix until well combined. Taste and adjust salt as needed.Tips:If beets are firm, mash them lightly for a smoother filling or leave some chunks for texture. For a creamier filling, blend briefly; for chunkier texture, pulse less.Notes:Filling can be made ahead and refrigerated for up to 1 day.Step 3: Roll dough and cut circles
Roll out the pierogi dough on a lightly floured surface to about 1/8 inch (3 mm) thickness. Cut into circles using a 3–3.5 inch (7–9 cm) cutter or a cup. Keep dough scraps covered to prevent drying.Tips:Lightly flour the surface to prevent sticking and avoid overworking the dough, which can make it tough.Notes:If dough tears, gather scraps and reroll; if very dry, brush with a tiny amount of water.Step 4: Fill, seal and crimp
Place about 1 generous teaspoon of filling on the center of each circle. Moisten the rim with water, fold over to make a half-moon, and press or crimp the edges tightly to seal. Use a fork to crimp the edges for a classic seal.Tips:Do not overfill; sealing is crucial to prevent leaks during boiling.Notes:If the dough feels dry, cover and rest for 10 minutes to relax the gluten.Step 5: Boil pierogi
Bring a large pot of salted water to a boil. Working in batches, drop pierogi into the boiling water and cook until they float to the surface, about 5–7 minutes. Remove with a slotted spoon and drain well.Tips:Do not overcrowd the pot; add batches as space allows. For best texture, chilling a few minutes before boiling can help the dough hold its shape.Notes:If you prefer a browned exterior, you can pan-fry boiled pierogi in a little butter after draining.Step 6: Serve
Serve the pierogi hot with sour cream to taste. Optional garnishes include chopped chives or dill, and a drizzle of browned butter for extra richness.Tips:Reheat gently to avoid soggy dough; leftovers refrigerate 2–3 days and can be reheated by boiling briefly or pan-frying.Notes:Any unused filling can be tucked into a frittata or spread on toast.
Frequently Asked Questions
How should I prep pierogi dough to avoid a tough, chewy result?
Work with cold ingredients, measure accurately, and knead just until smooth. Rest the dough for 15–30 minutes, then roll on a lightly floured surface to about 1/8 inch thickness. If it’s sticking, dust with more flour and keep the surface lightly floured.
How much filling should I put in each pierogi to prevent leaks?
Aim for about 1 teaspoon to 1 tablespoon of filling per circle, depending on the size. Don’t overfill; the goal is a compact filling that can seal easily without squeezing out.
What’s the best way to seal pierogi so they don’t open while cooking?
Moisten the edge with water, fold the dough over the filling, and press firmly to seal. Use a gentle crimp with a fork or pinch the seam to ensure a tight seal.
How long do pierogi take to cook and how can I tell they’re done?
Drop batches into well-salted boiling water. They’re done when they float to the surface, then cook for another 1–2 minutes. In total, about 5–7 minutes. Taste one to be sure.
Should I boil them first or can I fry them right away?
Boil them first for a classic texture and then you can optionally brown them in a little butter for extra flavor and color. Both methods work well with the beet & goat cheese filling.
How do I handle the beet filling to keep color and flavor?
Cook the beets until tender, dice them evenly, and mix with the goat cheese and sautéed onions. Season with salt and pepper to taste. Let the filling cool a bit before stuffing to help it seal better.
How should I prepare the onions for the filling?
Finely chop and sauté in butter until translucent and slightly golden. This brings sweetness and depth to the filling. Add a pinch of salt during sautéing for flavor.
What are good ways to store uncooked pierogi or leftover filling?
Uncooked, shaped pierogi can be frozen on a parchment-lined tray, then stored in a bag for up to 2–3 months. Refrigerate the filling if leftovers are needed, and use within a couple of days.
What are common beginner mistakes and how can I avoid them?
Overfilling, not sealing edges, or letting dough dry out are the most common. Prevent by measuring filling carefully, sealing edges well, and keeping the dough and workspace lightly floured and covered when not rolling.
What equipment makes making pierogi easier for beginners?
A sturdy rolling pin, a circle cutter or a cup/glass to make even dough rounds, and a slotted spoon for removing boiled pierogi. A nonstick surface or well-floured board helps prevent sticking and makes sealing easier.
Additional Information
Dietary Considerations
Contains dairy (goat cheese, butter, sour cream) and gluten (pierogi dough). Vegetarian as written. To make gluten-free, use a gluten-free pierogi dough or GF wrappers and ensure any toppings are GF. For vegan or dairy-free guests, substitute the goat cheese with a plant-based cheese, replace butter with olive oil, and serve with dairy-free sour cream or cashew yogurt. For lactose-intolerant guests, offer lactose-free sour cream alternatives. Reduce sodium by using less salt or choosing unsalted butter and a lower-sodium cheese option. Store leftovers refrigerated for 1–2 days and rewarm gently. If nut allergies are a concern, omit the toasted nuts or use seeds like pumpkin seeds as a crunch substitute.
Pairings
Beet and goat cheese have earthy, tangy notes that pair well with bright acidity and gentle sweetness. Recommended beverages include dry Riesling, Grüner Veltliner, Sauvignon Blanc, or Pinot Grigio to complement the beets and balance the richness of the cheese. Sparkling wine (Brut) or a light pilsner/wheat beer provides a refreshing contrast and keeps the palate lively. For non-alcoholic options, try sparkling water with a splash of lemon, or a beet-ginger mocktail. On the plate, pair with a simple arugula salad tossed in lemon vinaigrette with toasted walnuts or pecans, and consider a light drizzle of balsamic reduction or chive oil to echo the beets’ sweetness. Garnish ideas include fresh dill, chives, or parsley. For a heartier menu, serve alongside pan-seared chicken, grilled kielbasa, or prosciutto on the side, so guests can mix and match textures without overpowering the pierogi. Add textural contrast with toasted nuts or seeds for crunch and a pop of color like pomegranate seeds or orange zest.
Serving Suggestions
Serve the pierogi hot, ideally just after boiling (5–7 minutes until they float). For a touch of crust, quickly pan-sauté in a little butter for 1–2 minutes per side and plate on warmed dishes. Offer a dollop of sour cream on the side or a dollop of dill-chive yogurt sauce to brighten the filling. Plate 3–5 pierogi per person depending on portion size, with a small green salad and perhaps roasted beets or cucumber ribbons for color. Finish with a light shower of cracked black pepper and a sprinkle of fresh dill or chives. If preparing ahead, keep the filling and dough refrigerated and boil just before serving; you can finish with a quick sear to re-crisp.
Beet & Goat Cheese Pierogi
Allergens:
Cuisine:
Course:
Description
Deliciously soft pierogi filled with earthy beets and creamy goat cheese, perfect for a quick and satisfying meal.
Ingredients
- pierogi dough: 2 cups
- beet, cooked and diced: 1 cup
- goat cheese: 1 cup
- onion, finely chopped: 1 medium
- butter: 2 tablespoons
- salt: 1 teaspoon
- pepper: 1 teaspoon
- sour cream (for serving): 0 to taste
Date Created:
11/29/2025